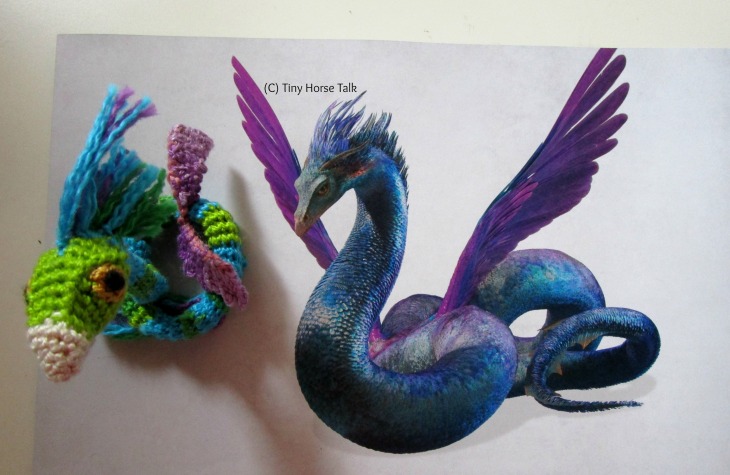
As requested, this is the first part of the crochet pattern for the Occamy from Fantastic Beasts and Where to Find Them. I’m splitting the pattern in half as there are a few fiddly bits that deserve their own posts.

NB. This is a small and fiddly pattern, so if you are eyeing this up as a first crochet project, I would suggest you find a few larger projects to do first before coming back to this.
Materials
– 2mm crochet hook
– Thin yarn in light blue, cream, gold, various shades of green and various shades of purple
– Stitch marker
– Pipe cleaner (any colour, but fold the ends down so they aren’t sharp)
– Small amount of stuffing
– Very small piece of black felt
– Glue
Abbreviations
dc = double crochet
rnd = round
inc = increase
st/s = stitch/es
FPtr = front-post treble crochet
dc2tog = double crochet 2 stitches together
sl st = slip stitch
ch = chain
Notes
This project is made using the amigurumi technique, crocheting in a continuous spiral instead of joining at the end of each row. It is also in UK crochet terms, and a quick Google search can find a conversion table for UK/US terms.
Method
Head
With cream yarn, 4dc into magic ring.
Rnd 1: 1dc, inc into next 2dc, 1dc. (6 sts)
Rnd 2: 2dc, inc into next 2dc, 2dc. (8 sts)
Rnd 3: 3dc, inc into next 2dc, 3dc. (10 sts)
Rnd 4: 1dc into each st around. Join in palest green. (10 sts)
Rnd 5: 1dc into 1st 2 sts, FPtr into next st, skip next stitch, inc into next stitch, FPtr into next st, 1dc into each st to end. (10 sts)
Rnd 6: 1dc, inc into next st, FPtr, 2dc, FPtr, inc into next st, 1dc into each st to end. (12 sts)
Rnd 7: 2dc, inc into next st, FPtr, 2dc, FPtr, inc into next st, 1dc into each st to end. (14 sts)
Rnd 8: 3dc, inc into next st, FPtr, inc into next st, 1dc, FPtr, inc into next st, 1dc into each st to end. (17 sts)
Rnd 9: 5dc, FPtr, 1dc, inc into next st, 1dc, FPtr, 1dc into each st to end. (18 sts)
Rnd 10: 5dc, FPtr, 1dc, increase changing to light blue for the second increase st, change back to green and 2dc, FPtr, 1dc into each st to end. (19 sts)
Rnd 11: 3dc, dc2tog, FPtr, 2dc, increase into blue st from previous row with blue, 2dc in green, FPtr, 1dc, dc2tog, 1dc into each st to end. (18 sts)
Rnd 12: 2dc, dc2tog, FPtr, 2dc, increase into second blue st from previous row with blue, 2dc in green, FPtr, dc2tog, 1dc into each st to end. Fasten off green. (17 sts)
Rnd 13: Using blue, *2dc, dc2tog* to last st, 1dc. (13 sts)
Put the head on the end of the pipe cleaner and stuff lightly.
Rnd 14: *1dc, dc2tog* to last st, 1dc. Fasten off. (9 sts)
Eyes (make 2)
With gold yarn, 6dc into magic ring. Sl st into 1st st and fasten off. Sew to side of head just under ridge with tail of yarn. Cut very small circle of black felt and glue in centre of eye.
Body
Using blue, 6dc into magic ring.
Rnd 1: *1dc, inc into next st* around. (9 sts)
Rnd 2: 1dc into each st around. (9 sts)
Repeat rnd 2 working up the pipe cleaner, changing between blue and the various shades of green randomly to create green ‘sheen’. Stop at base of head with blue and sl st to base of head.
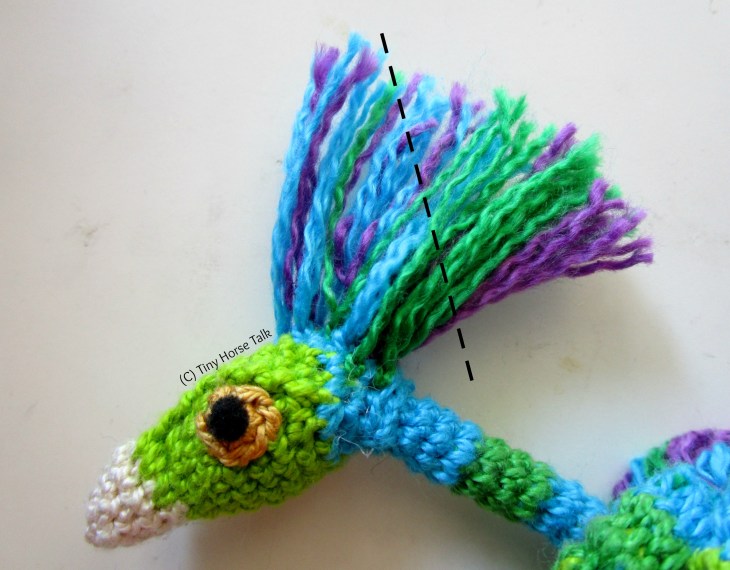
Crest and Tail
Cut 5 9cm lengths of yarn in blue, dark green and dark purple. Use your hook to pull the lengths through the blue sts on top of the head, securing in place by putting the ends through the loops you pull through. Trim along line below:
Repeat for tail, working around and up the tip slowly. Use the tail of the magic ring in the tail.
You can also tease the yarn if you like, as I’ve done here, but it’s not necessary.
Part 1 complete! If you have any questions about the pattern, or parts that don’t make sense, or you’ve made your own Occamy using this, please comment, I’d love to hear feedback. Please don’t sell this pattern or make Occamies from this to sell, it’s just for fun – and a beautiful friend for your shelves. Part 2 will cover making the wings and general finishing.
Anyways, see ya!
FillieFanatic

I may have squealed when this popped up in my WordPress Reader – thank you so much for sharing the pattern! 😀 I can’t wait to crochet an Occamy for my bookshelf. Your pattern is amazingly detailed, I didn’t notice the eye ridges until now – and I love the threads for the crest! I’m so excited for my next crochet project now ^__^
LikeLike
Thank you for all your compliments, they made my day. I’m excited to see your version! 😊
LikeLiked by 1 person